 . This is how I see it? Wires! But there's no block connector to join the output side? Or do I just twist them together and insulation tape them? Also where do the driver go? .
Great Googly Moogly
 . This is how I see it? Wires! But there's no block connector to join the output side? Or do I just twist them together and insulation tape them? Also where do the driver go? .
 No Marcus there's none but looking at me pic I'd sware I got it rite as all the wires marry up likeMarcus wrote:Any instructions in the parcel Captain?
I'd wire it up for you, but I ain;t doing it over this internet... You'll end up with curlier bollock hair when you plug it in.
Has IS got a video guide or something?
. It's where to put the driver see is getting me I'll have to gorrila tape it to the light hangers  . I'll figure it out but I hope my diagram is rite
  I ain't got hairs on my nuts bach I shave mine
aye i got my skylines i looked at them same principle on the input side
uhhhhhGreenfingers wrote: ↑Wed Jun 17, 2020 8:52 pmwhat you dont want to do is do it bacj to front or your lights will shine the wrong way...

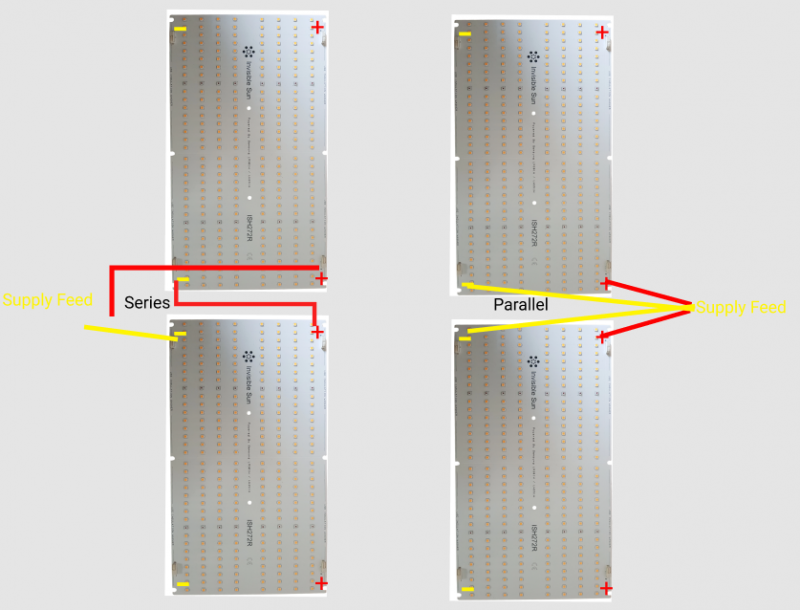
Capt...this picture is how to wire it....the two wires you have with bare ends connect to the board and the bits with the connector on connect to the driver. Brown to the + and blue to the - (the boards should be configured so the terminals are opposite/next to each other). You will also need a piece of link wire as shown in MrNice's drawing to complete the circuit - 1 wire connecting from + on one board to - on the other board. The connectors are all push connectors so joining the 2 wires together is easy...just push brown to brown and blue to blue. On the board, they are push fit too..push the wire through the little hole in the plastic and the metal tension grip should hold it in place.MrNice wrote: ↑Mon Jun 01, 2020 11:47 pmInvisible Sun LED ISH265 Pro quick assembly video
https://www.youtube.com/watch?time_cont ... e=emb_logo
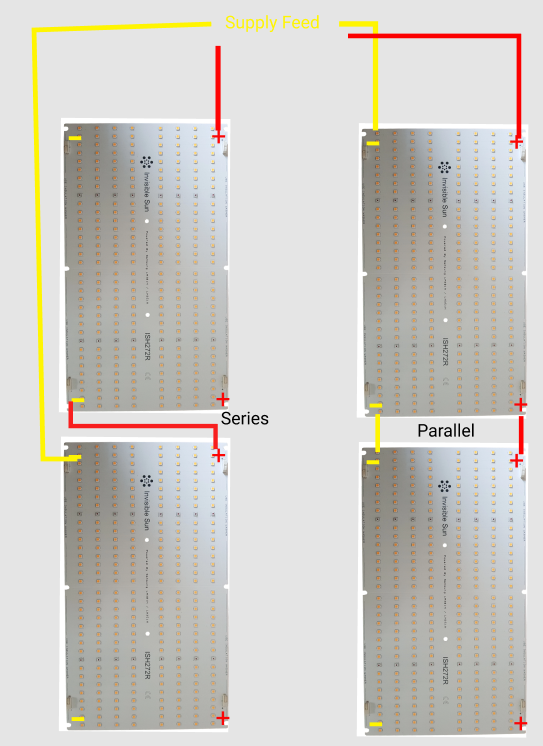
MrNice rough ass drawing


Ta for thatBeef wrote:Capt...this picture is how to wire it....the two wires you have with bare ends connect to the board and the bits with the connector on connect to the driver. Brown to the + and blue to the - (the boards should be configured so the terminals are opposite/next to each other). You will also need a piece of link wire as shown in MrNice's drawing to complete the circuit - 1 wire connecting from + on one board to - on the other board. The connectors are all push connectors so joining the 2 wires together is easy...just push brown to brown and blue to blue. On the board, they are push fit too..push the wire through the little hole in the plastic and the metal tension grip should hold it in place.MrNice wrote: ↑Mon Jun 01, 2020 11:47 pmInvisible Sun LED ISH265 Pro quick assembly video
https://www.youtube.com/watch?time_cont ... e=emb_logo
MrNice rough ass drawing
The other side is just a connector for the mains so the brown to the brown the blue to blue and the green/yellow one to the green/yellow one (put the end caps over the wires first so then screw it together once wired then wires nice and sealed).
Then take pictures before plugging in. hope this helps!
so the bare wires push into panels and the bare outlet wires go into the blocks? I'll watch that video before I do it. .  so the bare wires push into panels and the bare outlet wires go into the blocks? I'll watch that video before I do it. .
 Ta for that
so the bare wires push into panels and the bare outlet wires go into the blocks? I'll watch that video before I do it. . 
How do you want it wired Captain? Do you want the main wire coming out of the middle of that light panel or at either one of the ends?captain beefheart wrote: ↑Wed Jun 17, 2020 8:40 pmRite o I decided I'm gonna wire it myself
Great Googly Moogly
This is spot on, basically what you need to do.Beef wrote: ↑Thu Jun 18, 2020 12:59 amCapt...this picture is how to wire it....the two wires you have with bare ends connect to the board and the bits with the connector on connect to the driver. Brown to the + and blue to the - (the boards should be configured so the terminals are opposite/next to each other). You will also need a piece of link wire as shown in MrNice's drawing to complete the circuit - 1 wire connecting from + on one board to - on the other board. The connectors are all push connectors so joining the 2 wires together is easy...just push brown to brown and blue to blue. On the board, they are push fit too..push the wire through the little hole in the plastic and the metal tension grip should hold it in place.
The other side is just a connector for the mains so the brown to the brown the blue to blue and the green/yellow one to the green/yellow one (put the end caps over the wires first so then screw it together once wired then wires nice and sealed).
Then take pictures before plugging in. hope this helps!
 Discord Growroom420 Podcast


